Thursday, June 6, 2013

'The Reef' a cover story

Before Memorial Day I was asked to do another ocean themed art journal cover. This one needed to be larger then the last two small ones (6" x 6") , I settled on 9" x 12" knowing that the whole picture would end being 12 x 18 and not wanting to get out of my com fort zone... I felted forward.

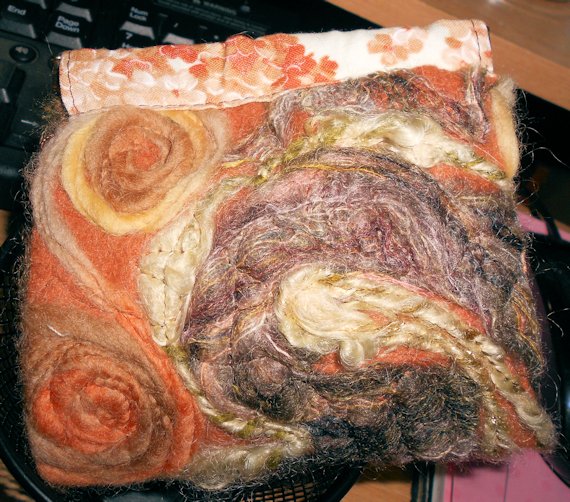
The first thing that needed to be done was to find a large enough sheet of felt for my background, harder than you might think as I don't normally keep anything larger then 12 "X 18" around,; I know your thinking didn't I say that was the size of the picture. Yes, but one rule of journal cover making is go larger, especially with felt;it has the tendency to get stretched out and sometimes even shrink after you worked it for awhile . Plus you'll need extra for making the inside flaps and such. I ended up sewing two sheets together to get the base length I wanted.

Now to start on the waves, and the background. Waves are easy, I use curly roving in a mixture of fleeces, silk throwster, and curly locks for the top part of the waves. As we gradually go down into the ocean, things start getting softer, Faux cashmere, assorted roving s, organdy ribbons appear.

Needle felt this area as you think  the waves should look. No interpretation is wrong , just go with the flow. As they are probably hard to see, I thread painted fish into my waves in the same shades as my roving , creating shadows  and depth.

Next came the middle , even though my wool fabric was a lovely shade of blue wool, I added a heathered
Harrieville fleece over it, muting the background. If you have never used heathered roving it is wonderful, comes in a wide variety of shades each is bright but muted down with flecks of soft black, in this case darker blues, some lighter and an occasional grey. Usually the colors in it are plays on the base color.This roving has a lot of air in it making it fluffy,  tons of small pills and fun to work with. It was just what i wanted for my background.

The next area is the reef..... 
 Using a Merino- Romney Cross roving in hand dyed multiple shades, I twisted and turned , felted down and begun again to create a reef that I liked. This roving cross mix had lots of character, as the wool locks were still noticeable after they were dyed and they made great coral. In the picture above I had added a large yellow parrot fish. he was removed later in the process. There are lots of nooks and crannies for spaces to add fish, and other sea life later in. Coral or underwater rocks are not whole lumps, make sure to leave open spaces. The above picture is from the front of the journal, you'll see it better later.
This is the back left side, colors are slightly different . notice the octopus ... he is hidden in the rocks. This is a good time to start adding in kelp, corals and anything else you want in the background. As a work in progress Up until the last moment and saying it was complete, I was still adding in kelp and corals and such.
This how its looks so far.

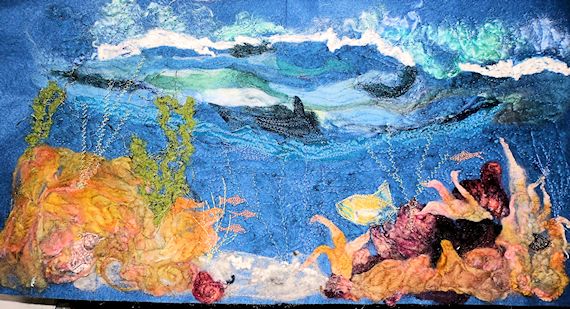
Next came the fish, and to take that big yellow one off, harder then you think and he was sewed on pretty tightly.
From here on out we are looking at the entire piece for now. A few fish here and there to start. I researched tropical reef fish on the net, found some I liked and printed them off. Cut them out and sewed them on. They came out a little lighter ( probably due to low ink in my printer) then I wanted so using fabric markers I re-enhanced their colors. Most tropical reef  fish are brightly colored.
I thread painted orange shadow fish in the background, didn't really like them but once on I could not take them off. So look for how I fixed this error in the following pictures.
I machine stitched coral strands in  the background, hand dyed burlap to make unique shapes, added in ribbon & yarn kelp strands. Then came the fun part....

A few more fish. In this entire process every few steps I went back and free motioned stitched , this will add not only depth to my picture, but durability if the person who owns it handles it often.It also helps create an illusion , especially if you use tone on tone thread, so your seeing thing in the distance and others up closer to the front. Before beading, I added in more layers of corals, fans and rocks. Then came the beading.
Oh, I should note, I also  added in pieces of shiny tulle and organza , both are clear and make great fan and stick corals, hard to see in the pictures but fairly easy to use.
The beads just went were ever I chose to put them, no real rhyme or reason.I did make sure I used shapes that wouldn't look out of place under the water, pearls, rocks and tear drop beads (which made great sea anemone). 

Here is the finished piece.

Front of Journal
Back of Journal
Opened, with hardbound journal inside. I blanket stitched all edges to finish .

'THE REEF'
Enjoy- TNfrmgrl

Thursday, May 23, 2013

Fiber Art Journals

Last September I started working on Fiber Art Journals. I sold 2 lined ones at a show in November, then In February of this year I sold one with a theme of the Emerald Coast. The same person that bought that one recently purchased a second in this series called Pacific Ocean Kelp Garden. There is just something about water that draws us in and inspires the imagination.
Pacific Ocean Kelp Garden - opened up so you can see the whole picture.
closed- Front


Emerald Coast Art Journal opened to see whole picture
closed- Back


Thinking about doing several more in this series, maybe one on the Maine Coast, Alaskan Coast, Eastern Atlantic Coast , Great Barrier Reef . Just thinking aloud. There is something about these waters that draw you in and enchant you.
I didn't think it would be so hard to find marine life charms or implements. I found loads of nautical themed items. But not too many charms in the shape of fish (lots of gaudy plastic ones...icky). With the exceptions of Whales, Sea turtles, Starfish, Dolphins and shells. What is up with that ?  
In the Pacific Journal I was able to make a fish/ eel coming out of a rock using a dyed cocoon, then machined stitched and hand painted in a molted pattern. It looks more like a fish now then an eel. But I like it.
Closed -Front
Its strange I had been thinking about doing some new Journal covers when this custom order came in. I was given free rein to do any ocean theme I wanted as long as it had to with the ocean/sea. From researching on the net about the Pacific I saw lots of dark blue waters ( at least along the CA,OR, WA coastal areas, not as vibrant as here in the south;but beautiful nevertheless. That's not to say the waters there are not colorful, just a different shade of blue green. :) Regardless, I enjoyed making it. 


That's been my week so far. Happy creating... Happy Memorial Day Weekend!
-TNfrmgrl

Wednesday, May 15, 2013

'A Jones of all Trades'


 Have you seen anything more beautiful, if you look closely it was a double Rainbow , even though your only seeing part of it this was a complete arch. Awesome!!! The glow coming off of it....the picture really did not do it justice.


Its the night before the opening of the consignment shop ' A Jones of all Trades'.
This is the shop that my father-in-law and myself added some of our products too.  It is a quaint little shop just past the Davidson / Wilson county line here in Middle Tennessee. I had the chance to meet two of the vendors this past Friday at a special 'meet-n-greet'  before it opened.

The first was Tina Waller, she makes the most awesome crochets items and origami mobiles, There was a Koi fish one that both HK and I fell in love with. On a personal note there was one crocheted bag limey/olive green with  mauve red rosettes that was calling my name.

Tina's link is below just copy it into your browser:

www.facebook.com/pages/Tina-Waller-Designs


Here are a few items from the back room.  Wooden toys ( At Woods End), crocheted items  (Tina Waller Designs), baby blankets, hair barrettes and bobs and more.


The second vendor was Amanda K, of AmandaKDesigns, she had a great assortment of products. From cool jewelry, to window frame art, to pillows and so much more. You can check her out on Facebook, just copy  the link below into your browser:

www.facebook.com/AmandaKdesigns

As you walk in the front door you are greeted with pale yellow walls , that sets the mood  of all the rich vibrant tones and goodies you'll find inside on the walls and displayed throughout.


Of course, don't forget you can also just go straight to the source
here is the link to "A Jones of all Trades", and see all the wonderful vendors.
www.facebook.com/ajonesofalltrades


Be sure and stop in and say hello to the owner  Becca Jones , she is also the artist of some of the amazing jewelry you will find here.
Seen sitting here , behind their handmade counters, made from wooden legs and pallets, very shabby chic.(I would love to have some of these for my front porch with a sheet of glass on top. so easy to make a really great idea!)


You will find something for everyone here. To list a few more, wooden bowls, jewelry, mason jar sipper cups, stone oil lamps, homemade candles, hand painted wall art, photographic prints,walking sticks, aprons, needle felted clutches, decorative window panes, wooden  displays and so much more.

If you have the chance stop in a say hello, browse around. New vendors/ items will be added. So check back often.

As for me, today I spent anticipating tomorrow and getting back on my feet. Keep me in your prayers as I'm a little nervous. Lots of fun alcohol ink necklaces added to Etsy site, and working new purses.

-TNfrmgrl


Thursday, May 2, 2013

Scissors and more...

Do you ever wonder about the things in your craft room ? I am sitting here staring at a pile of scissors. Each one has its own uses and special quality, but so many.I put some on my peg wall board and it took up the whole bottom of the board.!!!!! Do you have a pile like mine?
left to right : 2 pair 'Tonic' brand, duck billed applique, Gingher pinks, Swiss thread snippers , Finny, Cutter Bees,
Embroidery scissors 1 (the best), Embroidery scissors 2 (the worst) Old pair blunt nose Gingher , Old pair Stainless, paper scissors (cheap) and at the top assorted rotary cutters.

Being a crafty girl and liking so many different  crafts, I have moo goo's amounts of a stuff. I counted my thread spools the other day, hoping to get them on a wall so I could organize them by color. I like thread.. Did you notice I didn't tell you how many I have. Psst., quiet now as I say it in a whispered voice.... a little over 300.There is NOWAY I can fit them on a wall and still see outside.So alas they stay in my bucket tub near my sewing table. My father in -law bless his heart offered to make me a large spool holder... I don't think He knew what he was getting into... I quickly told him to forget about it.
There are other items that amaze me too but my list could go and I wouldn't want to scare anyone off with all my craft room  craziness.


Working on a new line of stream line denim clutches called 'Stitches'. These fun little gems are made from  bits and pieces of scrap denim, cotton fabric, wild stitchery and needle felting stripes. They feature five pockets and close with a magnetic snap.There will be about 6 different colors when I'm through, the first one was done in yellow, black and green.


 I finally got around to trying out my walking foot attachment on my sewing machine, it works really well on thick fabrics.


Threads, beads, scissors, paints , felting stuff, scrapbook stuff, need I go on......

Have a great day. - TNfrmgrl

Wednesday, April 17, 2013

Flex Frame Update

I was way up early this morning (4 AM) and was working on my 'flex frame' pockets.
The thought hit me ( don't you just love early morning revelations)that if I used a thinner fabric where the frame actually is, it might just open easier.
(You may remember I showed you the two coin purses I had made using the 3.5 inch flex frames, that were  a little hard to open .)  Thinner fabrics are the key. I took a needle felted base, cut it down to size, added a lining to it, then folded the tops down, sewed it together, and pushed the frame in place.
Of coarse it wasn't that easy, the pin that is used to hold the frame in place got stuck about half way in.
Anatomy of a flex frame pin (Pic.A)
assorted flex frame pins and cotter pins (pic.A)
is this: made of brass, it is slightly larger then the base it goes into, and has a crosshatch pattern about mid way through ( I suppose to help grip the edges and hold together better), the thing is; once you start to set the piece, and it's going in you CANNOT back it back out to start over. I pushed on it, I pulled on it, I pushed , and pushed and finally SNAP it went into place. Yahoo!
You can choose to use hardware store cotter pins instead of the brass or zinc that came with them , or if you loose one, just remember to take one with you to get the correct size and that you will have to trim it with bolt or wire cutters. An advantage to using the cotter pin is you have a nice little handle joint at the top, great for wristlets, backpack pulls etc.
I guess I should mention that on this project I did use a 4.5 frame instead of a 3.5 (pic.B)  , on the smaller one I added a wool sleeve onto the pocket, whereas on the larger one the lining made up the frame sleeve.
4.5 and 3.5  pockets with flex frame (pic.B)
Thinking on it, also made me realize that the longer length may have helped on the opening and closing of it too.

See how easy it opened, and Yes, that is metallic thread, pretty huh?
Tricky as it may be I love metallic thread. I didn't use it on this project but at the end of this post I'll show you one I did.
Almost finished, still have to sew the sided, which I will hand sew with  #8 Perle thread.
If your not familiar with Perle thread it is a heavier hand embroidery thread that the strands are wound together so that you do not separate to use. It comes in various thicknesses, I like the #8 use all the time & #10 (which is harder to find) DMC makes a great selection of colors. If you can't find it, craft embroidery thread like for friendship bracelets works well too.

As promised here is a needle felted piece that I used metallic thread on, it was a Madeira Gold variegated.
The piece here on the right shows the metallic thread on a flat surface, you can make out the color and a little sparkle.
This one shows the entire piece , you get the depth but because i used it on a needle felted piece with heavy roving, you loose the thread, with only a glimmer of flash. The top picture and this one are on the same piece. I will often use both regular rayon thread and metallic on my pieces. If you free motion stitch you can really create some interesting designs. The key is to go at a medium speed and not to pull on your fabric, just let it glide under your fingers. With time and practice just about any effect can be created.


One more Flex frame purse finished this afternoon.
(5 PM)
You'll notice it was the same piece I was going to use a sew on kiss frame with, that didn't happen as I couldn't get it to match up and look nice. I salvaged it and made this instead. The lining is a opalescent teal faux satin that changes color when light hits it.
It came out kind of cute. Unlike the previous brown one above, this one was a lot tighter in the sleeve & has a better closure to the frame.
-TNfrmgrl